


Abstract
In a highly evolved and developed world, where professionals seek greater knowledge and understanding of advanced surgeries and high technologies, basic concepts have become distant, posing challenges in achieving an accurate periodontal diagnosis. Therefore, utilizing a step-by-step clinical and radiographic periodontal assessment protocol can facilitate precise diagnosis. This editorial introduces the Periodontal Assessment Protocol (GF-PAPro), developed based on the most substantial scientific literature, to guide clinicians and experts in standardized clinical periodontal assessments.
Key words: assessment, periodontitis, protocol, classification, gingivitis
Background
According to the World Health Organization (WHO), severe periodontal disease, characterized by 6-mm pockets and significant alveolar bone loss, is on the rise. With more than 1 billion cases reported worldwide, periodontal disease is considered a public health concern.1 This trend is attributed to an aging population and increased longevity, along with socioeconomic factors. The global disease burden is expected to continue rising.1 Periodontal disease manifests in various forms, from gingivitis to severe chronic periodontal disease. Early diagnosis and treatment are essential for the successful management of periodontal disease and for slowing its progression.
Thus, periodontal assessment is a cornerstone of comprehensive dental care, serving as the primary means of detecting, diagnosing and monitoring periodontal diseases. Given the high prevalence of periodontal diseases around the world, severe periodontitis is estimated to affect 5–15% of adults; routine periodontal evaluations are essential.2, 3 These assessments typically involve a combination of visual examinations, probing measurements and radiographic assessment to evaluate the periodontal status. Tools such as Periodontal Screening and Recording (PSR),4 Basic Periodontal Examination (BPE)5 and GF-Periodontal Diagnosis and Risk Assessment (GF-PeDRA)6 are widely recommended for screenings, enabling clinicians to identify patients who require more comprehensive periodontal charting and intervention.
Beyond initial detection, periodontal assessments play a critical role in informing treatment planning and long-term maintenance strategies. Accurate diagnosis, incorporating clinical signs such as bleeding on probing (BoP), pocket depths, clinical attachment loss (CAL), and radiographic bone loss (RBL),7 is fundamental to effective patient care. Furthermore, understanding patient-specific risk factors, such as smoking and diabetes, enhances the ability to predict disease progression and tailor interventions accordingly. As periodontal research continues to evolve, integrating evidence-based guidelines and standardized assessment protocols remains crucial for improving patient outcomes and advancing oral healthcare practices.8
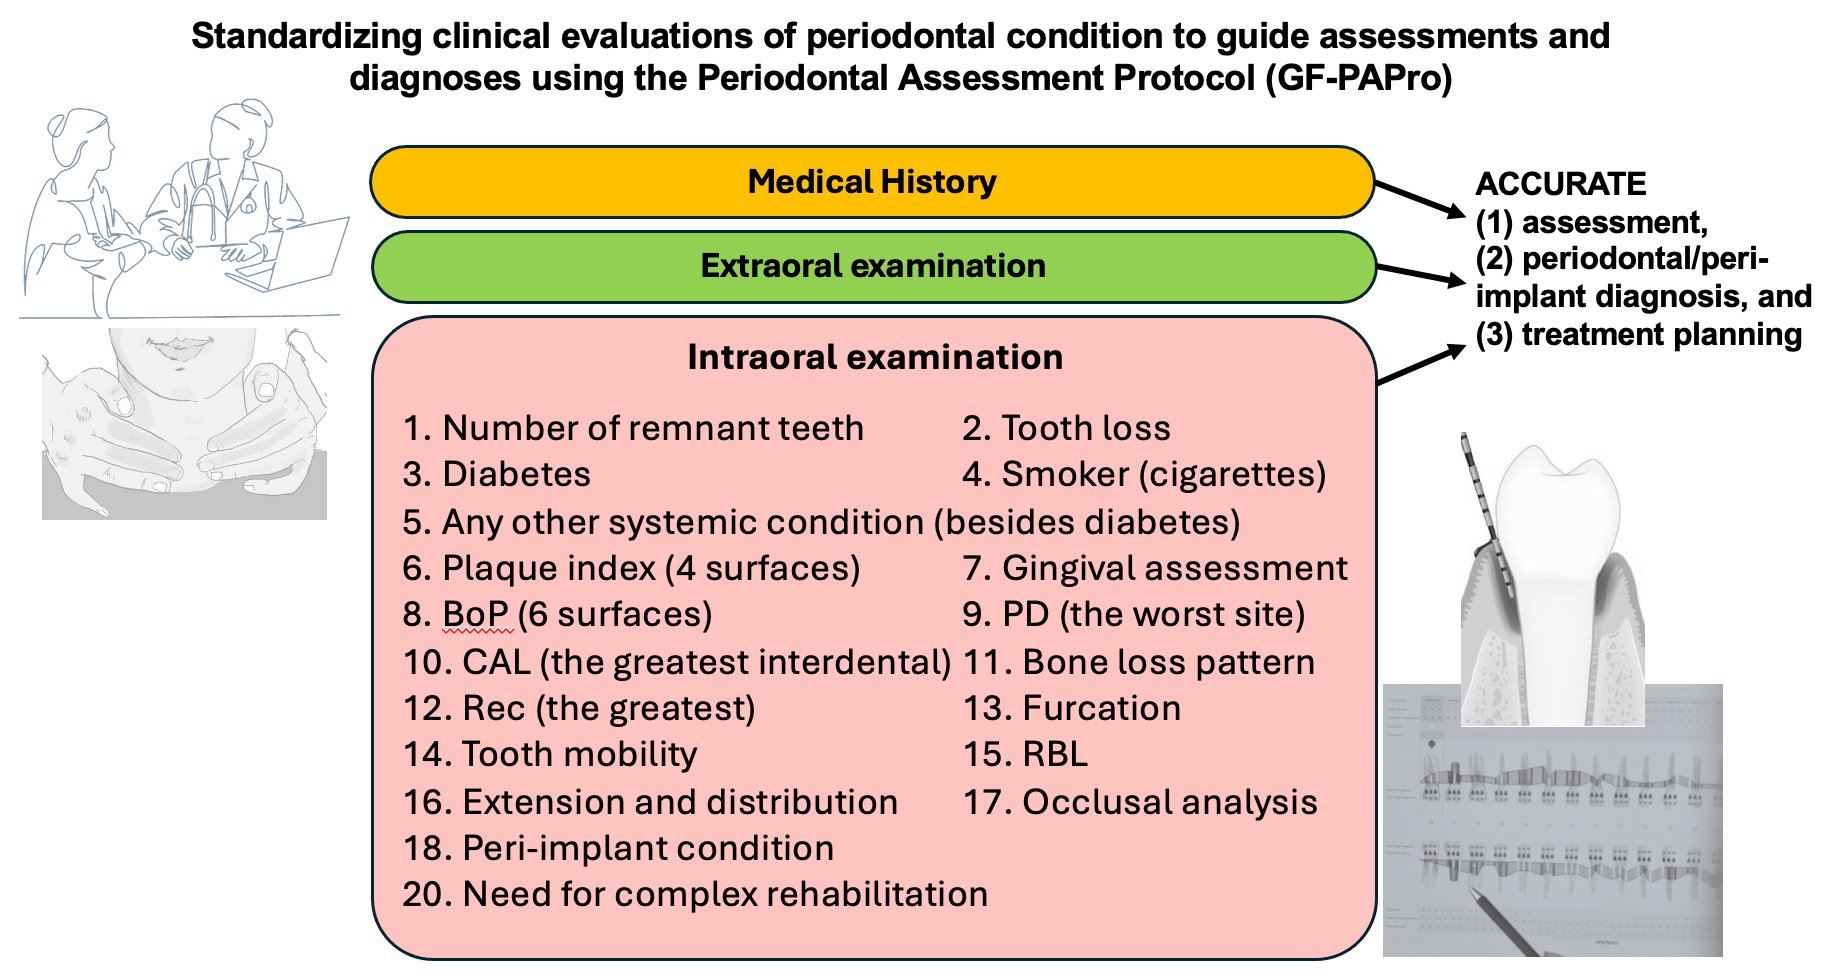
In a highly evolved and developed world, where professionals seek greater knowledge and understanding of advanced surgeries and high technologies, basic concepts have become distant, posing challenges in achieving an accurate periodontal diagnosis. Therefore, utilizing a step-by-step clinical and radiographic periodontal assessment protocol can facilitate precise diagnosis. Thus, this editorial introduces the Periodontal Assessment Protocol (GF-PAPro), developed based on the most substantial scientific literature, to guide clinicians and experts in standardized clinical periodontal assessments.
Step-by-step clinical periodontal examination
Medical and dental history
The patient should be regularly evaluated, paying attention to both systemic and oral conditions. Systemic and behavioral factors significantly influence disease progression and treatment outcomes. Next, document the systemic conditions (e.g., diabetes, cardiovascular diseases, smoking), note any medications that may affect the periodontium (e.g., phenytoin), consider smoking history and psychosocial factors, and provide a history of periodontal treatment and maintenance.9, 10
Extraoral examination
It is recommended to assess the lymph nodes, temporomandibular joint and trigeminal nerve outlets (including the supraorbital, infraorbital and mental foramina) for any tenderness, asymmetry or abnormal sensitivity. A thorough evaluation of the lips and cheeks should include inspection and palpation of both the cutaneous (external skin) and vermillion (red) zones of the lips, noting color, texture, hydration, presence of fissures, ulcers, or lesions. The cheek mucosa should be examined bilaterally for signs of trauma, leukoplakia, pigmentation, ulceration, or other mucosal abnormalities.
Intraoral examination
Inspect and palpate the tongue (dorsal, ventral and lateral surfaces) and other intraoral structures for any mucosal lesions, swellings or deviations that may indicate systemic or local pathology. Periodontal symptoms can overlap or mimic other conditions. A comprehensive intraoral exam helps prevent misdiagnosis. If applicable, scaling of plaque and calculus (debridement) before probing is strongly recommended. Then, 14 parameters are presented to achieve a precise and accurate clinical evaluation.11 The number of remnant teeth should be analyzed and registered, excluding periodontally hopeless teeth (extraction recommended).
Plaque and calculus detection
Use a disclosing agent to stain plaque or conduct a visual inspection and score the plaque index (e.g., Silness and Löe or O’Leary). This fact is significant because bacterial biofilm is the primary etiologic factor in periodontal and peri-implant diseases. Its presence and distribution inform oral hygiene instructions and risk assessment. Bacterial plaque is the main etiological factor of periodontal diseases (plaque-induced disease). Therefore, an accurate appraisal should link certain gingival inflammations to other conditions affecting the periodontium, resulting in a non-plaque-induced disease.
The most recommended exam is the O’Leary Plaque Control Record (PCR),12 which measures the presence or absence of plaque on tooth surfaces. It should record the presence (1) or absence (0) of plaque on four surfaces per tooth (buccal, lingual, mesial, distal) and must evaluate all teeth. Then, calculate: PCR (%) = (number of surfaces with plaque [max 4]/total number of surfaces examined) × 100.
Gingival assessment
Evaluate the color (healthy pink vs erythematous), contour (knife-edged vs rolled), consistency (firm vs edematous), and BoP (6 surfaces). Bleeding on probing is recognized as a crucial clinical indicator for assessing periodontal health and predicting disease progression, highlighting its importance in monitoring patients’ post-treatment outcomes.13, 14 It serves as a sign of inflammation in the periodontal tissues and is a valuable prognostic tool during the maintenance phase of periodontal therapy.15 Bleeding on probing is an early sign of gingival inflammation and correlates with disease activity; its persistence may be associated with future CAL. After probing the sulcus or periodontal pocket, it is recommended to observe the site for 5–10 s to determine if any bleeding occurs. It is essential to apply light, even pressure, ideally 15–25 g (0.15–0.25 N·cm),16 to prevent patient discomfort and ensure accurate readings.
Probing pocket depth or probing depth measurement
As described by Fernandes and Muller,2 periodontal probing should be performed with precise technique: The probe must be gently inserted to the base of the sulcus at the correct angulation, and advanced using the walking-stroke method. Six sites per tooth – mesiobuccal, mid-buccal, distobuccal, mesiolingual (or palatal), mid-lingual (or palatal), and distolingual (or palatal) – should be measured with a calibrated periodontal probe (e.g., UNC-15). Remember to apply slight pressure. Additionally, it is important to record pocket depths to the nearest millimeter: measurements of 4.1–4.4 mm are rounded down to 4 mm (with clinical discretion to round up at exactly 4.5 mm), whereas readings of 4.6–4.9 mm should be rounded up to 5 mm, always selecting the closest probe mark.2, 17 Probing depth (PD) provides insight into the depth of periodontal pockets as well as the degree of inflammation and detachment. It is crucial to assess gingival swelling or inflammation – conditions that can mimic a pseudopocket – and to confirm these findings with radiographic evaluation.17 Probing dental implants must be conducted carefully to prevent damage to the peri-implant tissues. Utilize a light probing force with a plastic or titanium peri-implant probe. Probing depths around dental implants should likewise be measured at 6 sites per implant. Unlike natural teeth, peri-implant soft tissues do not possess a periodontal ligament; consequently, PDs of 4–5 mm may fall within normal limits, particularly around tissue-level implants.
However, a progressive increase in PDs over time – particularly when accompanied by BoP, suppuration or radiographic evidence of bone loss – may signal peri-implant disease, such as peri-implant mucositis or peri-implantitis.18, 19, 20
Clinical attachment level
The CAL is the single most critical parameter in periodontal assessment, reflecting the position of the gingival margin (GM)relative to the cementoenamel junction (CEJ); under normal conditions, the GM lies approx. 1 mm coronal to the CEJ (though it may occasionally be 2 mm or more above).
For greater accuracy, the position of the GM must be clinically measured by detecting the CEJ and the actual position of the GM ([+] when above CEJ; [–] when below CEJ). As described by Fernandes and Fernandes,7 clinical attachment level (CAL) is calculated as the difference between PD and the position of the GM:
CAL = PD – GM.
When there is no gingival recession, the GM is assumed to lie 3 mm coronal to the CEJ, so CAL may be estimated as PD minus 3 mm. It is important to recognize that a GM positioned at the CEJ (0) often reflects minimal recession. Clinically, PDs up to 3 mm are considered normal – occasionally extending to 4 mm – and facilitate effective oral hygiene and thorough debridement. Consequently, a 3 mm PD threshold is recommended as the pedagogical and technical standard. In cases of gingival overgrowth (pseudopockets), however, PD readings may be artificially increased.7 Therefore, according to the 018 Classification, periodontitis requires the confirmation of interdental CAL at ≥2 non-adjacent teeth or buccal/facial CAL ≥3 mm with pocketing >3 mm on ≥2 teeth, while excluding non-periodontal causes (e.g., caries, trauma). Staging reflects the severity and complexity, ranging from stage I to stage IV, based on CAL, RBL, tooth loss, and other parameters described below. Grading reflects the rate of progression, where grade A indicates slow progression and grade C indicates rapid progression, based on risk factors and evidence of progression determined.
Bone loss pattern
The bone loss pattern is classified as horizontal (uniform reduction in bone height in the arch) and vertical (angular, oblique bone defects adjacent to the tooth). Horizontal bone loss is the most common form, while vertical bone loss is more complex and can lead to periodontal pockets or infrabony defects. Precise evaluation of these diagnostic patterns is essential to guide the selection, timing and design of periodontal regenerative therapies.
Gingival recession
Gingival recession (Rec) is associated with root sensitivity, aesthetic problems, and CAL. It is measured from the CEJ to the GM. However, if the GM position is equal to the CEJ (CAL = 0), a small Rec should be considered. The most widely adopted recession classification systems are those proposed by Miller21 and by Cairo et al.22
Miller’s classification is divided into 4 classes: class I – marginal tissue recession does not extend to the mucogingival junction (MGJ); there is no loss of interproximal bone or soft tissue, and it has an excellent prognosis for root coverage; class II – recession extends to or beyond the MGJ, but still with no loss of interproximal bone or soft tissue, resulting in an excellent prognosis for treatment; class III – recession extends beyond the MGJ with some loss of interproximal bone or soft tissue, or malpositioning of teeth, resulting in expected partial root coverage; and class IV – recession extends beyond the MGJ with severe loss of interproximal bone or soft tissue, or severe tooth malposition, presenting a poor prognosis with no possible root coverage.
The classification by Cairo et al. was developed to address some of Miller’s limitations, making it more applicable to both single and multiple recession-type defects. It is divided into 3 types: recession type 1 (RT1) involves recession with no interproximal CAL; the interproximal CEJ is clinically not detectable at both the mesial and distal aspects of the tooth, presenting facial CAL only. Within Cairo’s 2011 classification, Recession type 2 (RT2) is defined by the presence of gingival recession accompanied by interproximal CAL that is less than or equal to the buccal attachment loss (interproximal CAL ≤ buccal CAL).22 In contrast, recession type 3 (RT3) is characterized by interproximal attachment loss that exceeds the buccal attachment loss (interproximal CAL > buccal CAL).22
Furcation involvement
Furcation involvement indicates whether the case involves advanced periodontal destruction, significantly impacting prognosis and treatment. As detailed by Romana and Fernandes,23 furcation involvement may be assessed horizontally with a Nabers probe – using Glickman’s24 or Hamp, Nyman and Lindhe’s25 classification systems – or evaluated vertically according to Tarnow and Fletcher’s criteria.26 Glickman’s classification presents 4 different grades: grade I: Furcation is felt with the probe, but the tip does not enter the furcation more than 1 mm; grade II: Probe tip penetrates the furcation more than 1 mm, extending to ⅓ of the buccal to lingual width, but does not entirely go through to the other side; grade III: Furcation is not clinically visible, but the probe completely passes between the roots to the other side on mandibular molars and the maxillary first premolar (through-and-through). The probe passes between the roots and touches the palatal root on the maxillary molars; and grade IV: Same as Grade III, except that the furcation is clinically visible. Hamp, Nyman and Lindhe’s classification identifies 3 grades of furcation involvement: grade I: The probe penetrates horizontally into the furcation up to 3 mm; grade II: Probe penetration into the furcation is more than 3 mm but does not go through to the other side; and grade III: Penetration from one side to the other, through-and-through.
Essentially, the steps for furcation assessment involve: 1) inserting the probe beneath the margin and rotating the instrument’s tip into the furcation; 2) observing the horizontal extent of interradicular bone loss; 3) verifying the vertical bone loss with a periodontal probe; and 4) using the number of millimeters of bone loss (both horizontally and vertically) to determine the furcation involvement grade based on our recommendation (above).
Tooth mobility
Tooth mobility reflects periodontal support and occlusal trauma, influencing the decision to retain or extract a tooth. For evaluation, it is recommended to use the ends of 2 instrument handles to push the tooth in a buccolingual direction gently, or to use the index finger along with 1 end of an instrument handle. Always compare the mobility of a tooth with that of the adjacent or contralateral teeth. In addition to manual evaluation, Periotest or electronic devices can also be utilized.
Mobility can be assessed using either static or dynamic methods. Static mobility refers to the horizontal or vertical displacement of a tooth when gentle pressure is applied, typically using the ends of 2 instrument handles or a combination of an index finger and an instrument handle. The tooth is moved in a buccolingual direction, and its mobility is compared to adjacent or contralateral teeth. This traditional method provides a qualitative, momentary evaluation of looseness. Dynamic mobility, on the other hand, evaluates the tooth’s response to a rapid, low-impact force, typically using electronic devices such as the Periotest or the Tooth Mobility Measuring Device (TMD). These devices measure the damping characteristics of the periodontium and provide quantitative values that can be tracked over time, allowing for more objective and reproducible monitoring of changes in mobility, especially in cases involving splinted teeth, trauma or implants.
Miller’s Mobility Index (MMI) categorizes tooth mobility into 4 grades. Grade 0 – physiologic mobility – is defined as horizontal movement under 0.2 mm. Grade I denotes slight horizontal mobility in the buccolingual direction between 0.2 mm and 1 mm. Grade II reflects moderate horizontal mobility of 1 mm or more without vertical (axial) displacement. Grade III combines severe horizontal movement exceeding 1 mm with vertical depressibility of the tooth into its socket.27
Radiographs
Diagnostic radiographs are indispensable for accurate periodontitis diagnosis. A series of full-mouth X-rays (FMX) of 18 films –14 periapical images using the paralleling technique for precise bone-level assessment and 4 bitewings – provides comprehensive detail. Bitewing radiographs offer high-resolution views of crestal bone, whereas panoramic images serve as an adjunctive overview but lack the detail necessary for definitive diagnosis. In select cases, cone beam computed tomography (CBCT) may be employed to evaluate furcation involvement, implant planning or complex osseous defects. These imaging modalities allow clinicians to confirm furcation lesions (evidenced by radiolucency in molar furcations), assess crestal bone morphology (noting irregular contours, triangulation, or “fuzziness”), identify periapical pathology (to rule out endo-periodontal lesions), visualize interproximal calculus deposits (as radiopaque spurs), and examine root anatomy (including concavities, root length, and divergence).28, 29
The most recent guidelines emphasize the role of radiographic images in the visual assessment of interproximal alveolar bone levels and the determination of RBL. While periapical radiographs are commonly used to evaluate the periodontium around the roots and RBL, this type of image can present undesirable angulations and distortions. Bitewing X-rays, on the other hand, offer better diagnostic quality for determining the percentage of RBL relative to root length, while also allowing for assessment of the level and pattern of proximal bone loss.
When assessing radiographic bone levels, measure the distance from the CEJ to the alveolar bone crest. Given that the biological width (supracrestal tissue attachment) typically averages around 2.0 mm (with some individual variation), any CEJ–bone distance up to 2 mm should be considered within normal limits and not classified as RBL.
While variations can happen, it is essential to have a standard measure for guidance and sound clinical judgment. Thus, the calculation for the worst site with bone loss is: RBL (%) = ((distance from CEJ to bone) – 2.0 mm) × 10% (indicating that for each millimeter found in the result, it is considered 10%). This CEJ–bone crest measurement is essential for periodontal diagnosis: Values up to 2 mm (within the supracrestal tissue attachment) indicate no RBL whereas any distance exceeding 2 mm denotes the presence of RBL. Given the emphasis on the quality of radiographs (the best possible) for accurate periodontal diagnosis, clinicians must employ meticulous techniques when exposing radiographs, positioning the receptor to capture the desired teeth and supporting structures in the image. In order to develop diagnostically acceptable radiographs, students and professionals should recall the correct placement of the receptor, such as a digital sensor or radiographic film. The guidelines for proper film placement are summarized in Table 1 below.
To reduce distortion in the image of the teeth, the dental professional has to be skilled in a radiographic technique to produce the most accurate presentation of the dentition.30 It is noteworthy that current radiation safety guidelines for the use of lead aprons and collars have undergone changes. According to the American Dental Association (ADA), lead shields are no longer required for exposure to digital radiographs; however, clinicians must still follow the “as low as reasonably achievable” (ALARA) principle.31, 32
Extension and distribution
The extension and distribution of periodontitis refer to the extent to which the condition is present in the mouth. Proper classification is crucial for accurate diagnosis, prognosis and treatment planning in both gingivitis and periodontitis. In gingivitis cases, it is necessary to observe the number of sites with BoP; the condition will be localized if there is involvement of up to 30% of the sites, whereas a generalized condition involves more than 30% of the sites. When classifying periodontitis, it is considered localized if up to 30% of teeth are affected and generalized when more than 30% of teeth are involved. It is also necessary to consider the molar–incisor pattern, as well as former aggressive and juvenile periodontitis, which primarily affect the first molars and incisors, resulting in a significant vertical bone loss pattern.11
Occlusal analysis
Traumatic occlusion can exacerbate periodontal breakdown in the presence of inflammation. Identifying signs of occlusal trauma (wear facets, fremitus and mobility) is highly relevant; use articulating paper and clinical judgment to assess these signs.
Peri-implant condition
Assessing the condition of peri-implants is critical for classifying the health or disease status of dental implants, ensuring accurate diagnosis and guiding treatment planning for preventive maintenance or therapeutic interventions. The health condition of peri-implant tissues presents an absence of inflammation – no BoP or suppuration – with stable, shallow PDs (generally ≤4 mm, occasionally up to 5 mm) and no evidence of progressive bone loss beyond normal physiologic remodeling. For peri-implant mucositis, the clinical conditions include inflammation of the soft tissues surrounding the implant, with the presence of BoP and/or suppuration, increased PDs (which may be due to swelling), but with no bone loss beyond initial remodeling. In the case of peri-implantitis, there is inflammation of the peri-implant mucosa accompanied by progressive bone loss, with BoP and/or suppuration present, increased PDs compared to previous exams, and RBL beyond initial remodeling. In summary, implant assessment should include evaluation of PDs, BoP and suppuration, RBL relative to baseline, and KMW (ideally ≥2 mm), as well as consideration of occlusal loading and prosthetic design aspects.19
Need for complex rehabilitation
Need for complex rehabilitation is crucial for distinguishing between stage III and stage IV periodontitis, which are typically associated with significant periodontal destruction, tooth loss and impaired function. In these stages, patients often require complex interdisciplinary treatment to restore occlusal stability, esthetics and masticatory function. It may involve advanced surgical and prosthetic procedures, such as bone regeneration, guided tissue regeneration (GTR) and the use of dental implants to replace missing teeth. Stage IV periodontitis, in particular, indicates a high level of complexity in rehabilitation, as it involves severe alveolar bone loss, bite collapse, tooth migration (flaring and drifting), secondary occlusal trauma, and fewer than 10 opposing tooth pairs, necessitating not only periodontal treatment but also complex restorative approaches. Treatment planning in such cases involves careful occlusal analysis, evaluation of remaining periodontal support, and management of both natural dentition and implant-supported prostheses.11
How to use the GF-PAPRo checklist
The GF-PAPro checklist streamlines the intraoral periodontal examination by providing a structured framework to assess key clinical parameters. Using this tool, clinicians can systematically evaluate periodontal health and accurately classify patients as periodontally healthy, presenting with gingivitis or exhibiting periodontitis. In periodontitis cases, it aids in staging and grading. Each row corresponds to a specific clinical or diagnostic parameter (e.g., BoP, CAL, RBL), and the rightmost column (“Sequence for Periodontal Dx”) provides numbered steps aligned with the diagnostic flow. Red numbers indicate sequential steps used to diagnose gingivitis, whereas black numbers indicate steps used to diagnose periodontitis.
To use the step-by-step (the rightmost column in Table 2), it is necessary to complete the checklist row by row (sequentially from 1 to 20) for each patient. As you document findings, follow the sequence numbers in the right column, which correspond to the proposed diagnostic decision tree from Fernandes and Fernandes.7 After assessing each parameter, note its coded numeral: if it is a red number, incorporate the finding into your gingivitis diagnostic reasoning; if it is a black number, follow the periodontitis algorithm, including staging and grading modifiers. Examples of application (right column – diagnosis):
1. Step 1 (red and black): Measure interdental CAL. If CAL is present on at least 2 non-adjacent teeth, periodontitis is suspected.
2. Step 2 (red and black): Calculate percentage bone loss relative to patient age (RBL/age). Values above expected norms support a diagnosis of periodontitis.
3. Step 3 (red and black): Count teeth lost to periodontitis (including those deemed hopeless and planned for extraction).
4. Step 4:
– Black pathway: Re-measure PD to further characterize periodontitis.
– Red pathway: If BoP exceeds 10% of sites without any CAL or RBL, diagnose gingivitis; if BoP is ≤10%, consider the periodontium healthy.
5. Step 5:
– Red pathway: Note gingival phenotype (redness, edema, recession) to complete the gingivitis assessment or refine periodontitis staging.
– Black pathway: Review the pattern of bone loss (horizontal vs vertical) for periodontitis staging.
6. Step 6:
– Red pathway: Record the plaque index to contextualize gingival inflammation.
– Black pathway: Examine furcation involvement as part of periodontitis grading.
7. Step 7:
– Red pathway: Determine the extent and distribution of BoP: ≤10% excludes gingivitis, 10–30% indicates localized gingivitis, while >30% indicates generalized gingivitis.
– Black pathway: Assess tooth mobility to inform periodontitis severity.
8. Steps 8, 9, 11–13 (black only): Apply the staging (I–IV) and grading (A–C) criteria for periodontitis based on cumulative findings.
9. Step 10 (black only): Define distribution of disease – localized, generalized or molar–incisor pattern – to complete the periodontitis diagnosis.
By following these red- and black-coded steps in sequence, clinicians can rapidly differentiate gingivitis from periodontitis, stage and grade disease, and ensure a standardized, evidence-based diagnosis.
In summary, the red-coded steps rapidly identify gingivitis – relying on BoP in the absence of attachment loss or bone loss – while the black-coded steps provide a systematic pathway for diagnosing, staging and grading periodontitis. By adhering to this structured sequence, GF-PAPro ensures consistent, evidence-based diagnoses, enhances teaching and training, standardizes clinical documentation, and supports clear interdisciplinary communication.
Final considerations
Table 2 provides a summary checklist and sequence of assessments, detailing the clinical steps for periodontal evaluation and a recommended order for achieving a periodontal diagnosis. They can be used daily and make it easier to remember each clinical step. Furthermore, GF-PAPro is presented for the first time in the literature, allowing for the establishment of periodontal/peri-implant diagnosis, classifying the disease by severity, complexity, extent, and distribution (stage and grade), and analyzing all parameters recommended by the latest periodontal guidelines (2018), which include both clinical and radiographic parameters.11
Use of AI and AI-assisted technologies
Not applicable.